|
|
|
Miraj Review by Andrew Freeman |
|
|
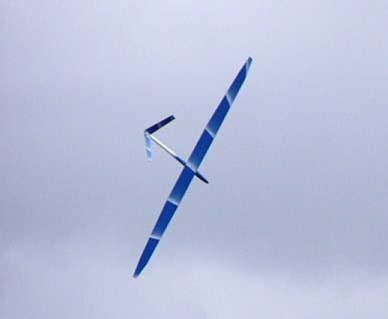
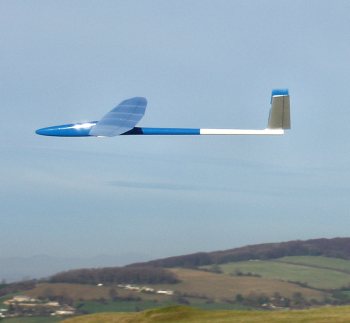
| I’ve fancied a relatively large performance sailplane for
a while but have been generally put off by the thought of having a hollow
moulded job and putting a ding in it, or worse. Having flown Phil’s Aldij
and been impressed by the performance, agility, docileness (no nasty
surprises) and also the ding-proof nature which all the Aeromod range
possess, I decided to order its slightly bigger brother, the Miraj. There
isn’t a huge difference between the two visually: the Miraj has the faster
MG06 wing section and is a foot bigger in span (2.5m/ 8ft). It is also
multi-tapered giving it a unique appearance.
So what do you get for your hard-earned cash?
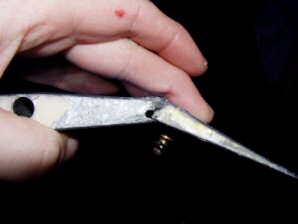
As it turned out no cock-ups emerged, which was nice, there’s a first time for everything I suppose. I won’t give a blow by blow account, but will highlight useful bits I have found and areas of the instructions which I...err.. ignored. The instructions began with assembling the wings, so that’s where I started too. With the control surfaces cut for you, all you have to do is dig out some foam from the leading edge of the control surface. A small flat bladed screwdriver is good, just keep the "digs" small and don’t tear too much out at once. You fill this hole with a 50:50 mixture (by volume) of epoxy and microballoons. This ties the skins together and increases the torsional stiffness of the control surface considerably. Remember to mask the control surface to prevent epoxy overspill from spoiling the finish. Hint: if you do get some epoxy where it shouldn’t be, WD40 makes a great epoxy remover. Simply spray some on a cloth and rub: it’ll soon dissolve it. If you need to remove the traces of WD40 for whatever reason, washing up liquid will take that off. Now, the instructions will have you silicone hinging the wing and then installing control horns, however I didn’t like the control horns supplied. These are brass M2 ball links, which in my opinion are far too weak for the job. There was also the added problem of length. The instructions say mount the link so the centreline of the ball is 15mm from the skin. A bit difficult to do when the link is only 15mm long itself! I decided to opt for some decent brass adjustable control horns from Gliders Distribution. These are epoxied in place when microballooning the leading edge. You also have to dig the foam out of the trailing edge of the wing so the control surface can tuck inside it when it moves down (see below). This is has the same effect as a wiper closing the gap up, but nowhere near as efficient I’m sure. I "painted" a very thin layer of epoxy on the foam just to prevent it from pulling out over time and also to aid the silicone in adhering when I did the hinges. The silicone hinging process is quite straight forward, when you know what you are doing.....my advice is practice it first! Hint: if you cock up the hinge, I have found it far easier and cleaner to remove when it has dried for about two hours (in its rubbery "green" state) than trying to wipe it off wet. First thing to do is to ensure everything is clean so the silicone can get a good key. Next is to temporarily tape the control surface to the wing using sellotape and set a hinge gap. I set a hinge gap of 0.8mm for the wing, and 0.6mm for the elevator. Make sure the control surface can move down adequately without binding.
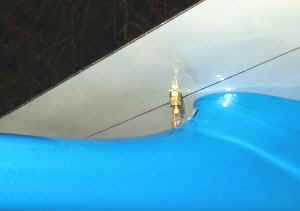
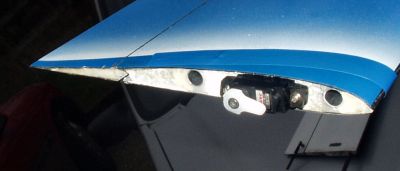
. . When you want to put the panel on, turn the servo horn so it doesn’t protrude above the skin, slide on the panel, power up the model and the servo will return to it’s normal position so you can connect up the pushrods. To take the panel off, simply push the horn back in below the skin and you can slide the panel off again. Simple. (see pictures). Mounting the wing is easy enough to do, but a spare pair of hands is always a bonus. The drill holes are marked on the wing so it is simply a case of drilling through, starting off with a small pilot hole. I drilled the holes so the screws were a tight fit, preventing the wing from rotating in the holes during assembly so it goes on straight. Lining the wing up on the fuz, I then drilled over size holes through the wing seat, so the captive nuts (mounted on individual ply plates) could initially "float" in the holes for allowing me to line up the wing. Using ½ hour epoxy, the plates were glued in place, but before the glue set, the wing was bolted on and the distance from wingtip to tail and wing tip to nose measured to ensure the distances were equal. It was simply a case of rotating the wing until they were (hence the need for the float) and then leaving the glue to set overnight, making sure it couldn’t move. I put insulation tape between the wing and seat to prevent the panel and fuz becoming a one-piece item during this stage. I replaced the slotted head screws that came with the kit with countersunk socket screws: this way a slipped screwdriver won’t damage your nice paintwork. The stabilisers slide onto two carbon tubes that are pre-fitted in the fuz. The problem with carbon tubes is that they can be brittle: once they start to crack you can’t stop them. To make them solid and hence far more tough and resistant to dodgy landings, here is a simple tip. Take some carbon tows and double/treble/ etc them up so they just about slide into the tube. Pass a thin piece of string through the tubes and tie the carbon tows to it. Wick slow setting epoxy into the tows and slowly pull them through: they may jam so take it carefully and try not to pull the string off or snap the string etc. Once the epoxy has gone rubbery, you can take a sharp knife and cut the excess tows off. All that’s left really is to make up a servo tray and pushrods (using the carbon tube provided) for the elevators, ailerons and flap. This is relatively straight forward so I won’t go into any detail, except that instead of epoxying the servos to the tray as suggested in the instructions, I spent a few more minutes making up some rails for the servos to be screwed on. You never know when you might have to replace a servo, and a few minutes spent here saves a lot of aggro later on. Flying: As the lift started to decay, landing was called for. Landing is extremely easy: the crow braking really slows the model down and you still have full control and you can just put it where you want. It was apparent that the speed range is quite impressive, suggesting the model will float around on a light lift day with a bit of camber wound in. I found out on Selsley a week or two later how well it would perform in light lift as there was barely enough to get the kites up. With the flaps dialled in to the suggested rates and a hard launch, it went into a steady climb with no hesitancy to climb out. I was surprised: effectively it was half ballasted (the Miraj can carry 700g of lead) and yet it didn’t seem to care (someone forgot to tell it there was no lift?!) I was expecting to have to go for a long walk but it never happened. I would love to see the 1.6 kg version go in light lift and I really can’t wait till summer when I can hook it into a decent thermal on a relaxing summer evenings soaring (followed by a bit of high octane adrenaline fun during the way down!). Each weekend I have been moving the C of G back a bit further towards the specified rear position. So far it appears to have improved the inverted performance (I barely have to put any down in), the model appears faster (it really does chew up the sky, even without any ballast), turns tighter and the aerobatics performance has improved no end. It bunts with ease and will do multiple cross wind square loops with no trouble so now I have no excuse for improving my aerobatics! So far there has been no sign of the nasty flick either, something which is attributable to v-tail models with a rear-ward C of G.
Would I recommend it? To anyone who like me wants a tough, large-ish, very aerobatic, high performance model that will just about fly in any wind strength from a light puff to a gale, is easy to fly (given enough experience of course!), doesn’t mind spending the extra time constructing it, I can heartily recommend it. It is going to be a firm favourite for a long time and should anything happen (touch wood) I’d certainly buy another.
So what next? Apart from using it for performance sloping, I am tempted to race it. Afterall, that is what it is for so watch this space. It is certainly a good model for getting into F3F racing. page by Phil http://www.scsa.org.uk/reviews/reviews.htm asw20q |