Pat Teakle ASW 20 |
Back to Reviews |
After working through most of the 1999 Easter holiday I decided to reward myself. I had been considering building something a little bigger than a Phase 6, so I browsed through Pat Teakle's catalogue of kits, and decided on the ASW20. This is 1:3.5 scale, so is 4.29 m span without the tip extensions (14 ft in Christian units), and 4.77 m with. Incidentally, Schleicher sailplanes have the designation AS (for Alexander Schleicher), then the designer's initial, (in this case W for Gerhard Weibel, K for Rudolf Kaiser, etc.) then a model number.
About two weeks after ordering the kit I got a phone call from Pat to say it was ready, and would I like to collect it? To save the carriage, and possible delays or damage I drove to Weston-super-Mare and collected it from Pat's workshop. It was only when I saw the fuselage leaning up against the wall, and it was taller than me, that I realised what I was taking on. The wing panels were even longer, but the whole lot fitted into the car with the back seat folded down, so no problems with transportation.
Pat's kits aren't exactly ARTF, but are very reasonably priced. He supplies a pair of flawless obechi/foam wing panels with substantial ramin spars. The wings have the bowden cable outers for the airbrakes, and a tube for the aileron servos built in. Spruce (or pine) strips for the leading edges are supplied. The polyester/glass fuselage is white gel-coated, and does not really require any additional finishing, although there is a moulding joint line top and bottom which might cause the purists to consider a respray necessary. The tailplane and rudder are white foam/veneer, and the elevator is solid balsa. There is a pair of optional wing tip extensions, and the canopy moulding plus 1/4" ply blanks to make the canopy frame.
You supply all the balsa (T/E, flaps, ailerons, wing tips); airbrakes; wing joiners; control linkages; servo mounts; plus all the gear. Also required are lots of adhesives; laminating epoxy; polyester resin; glass cloth; paint; solarfilm; sundry hardware items; and a hundred hours or more of hard but rewarding effort. You also supply a considerable amount of imagination (as in 'left to the...' by the building instructions). The total cost of the project was not far short of three times the initial price of the kit.
The first deviation from the recommended construction was in the method of joining the wings. I did use the 14 x 2 mm Graupner steel blade and brass box, but I laid the two brass boxes side by side and wrapped carbon tows coated with 24 hr Araldite around the ends (or rather just inboard of the ends), to a thickness of 3 - 4 mm and a width of about 10 mm. This resulted in a very strong centre section joiner. The drawing shows the boxes laid either side of a ply plate at the dihedral angle, but I decided I could achieve enough dihedral by inserting the blades into the wing at an angle, such that they touch the top spar boom at the inner end and the bottom spar boom at the outer. This meant tapered packing, but I considered the extra strength and simplicity of the centre section was worth it. The brass boxes are simply inserted into slightly oversize rectangular holes in the wing roots and fixed using thickened epoxy. I added a couple of layers of glass matting around the tubes inside just to make sure. This all took a fair bit of thinking about and some careful measuring and jigging to get it all lined up, but it does work well.
The only other significant difference from Pat's plan was to build a flap servo into each wing, rather than use the fuselage mounted servo with torque tubes. The kit is quite old now, and I guess when it first appeared computer transmitters had not been invented. I now (eventually) have all four wing servos independent, so the controls are as per full size: flaps are coupled to the ailerons to improve roll rate, and ailerons are coupled to thermal and reflex (speed) flap. Ailerons stay neutral with full landing flap, which can be mixed in with airbrake. I opted for larger than recommended airbrakes, making use of the Graupner 370 x 16 mm double blade brakes instead of the 250 mm version - more about this in a while. Otherwise the controls were pretty much as per plan - servos in the nose for elevator and rudder, in the centre section for the airbrakes.
The wings are glassed using 3 oz cloth, and sprayed with car acrylic aerosols (high-build primer and 'appliance white' gloss). It was the first time I had used this finish, and it took a lot longer than it should have. I used too much epoxy, not squeezing out the surplus, so had to do a lot of rubbing down, and the gloss paint always seemed to bloom, although the weather was warm enough - perhaps too humid, so the final coat had to be rubbed down with 1200 wet-and-dry and T-cut to get a half-decent gloss. The tailplane and wing control surfaces are all covered with white Solarfilm, but the rudder had to be painted to accept trim.
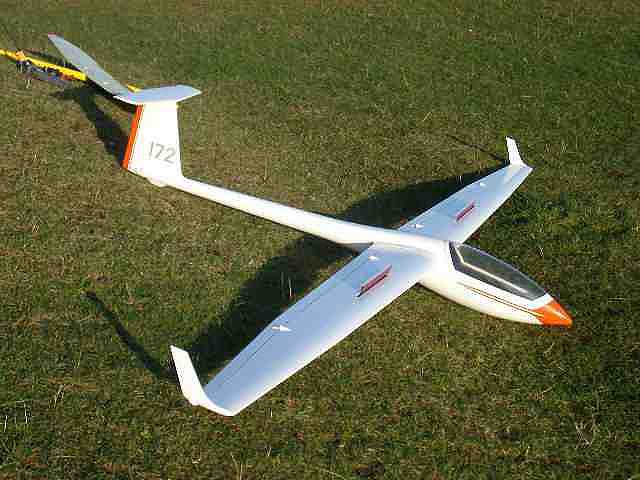
Ideally, the project should have been spread out over a few months, allowing ample time to build in cockpit details, dummy pilot, retracting wheel, hinged canopy etc. In practice, the summer was approaching, and I decided all that could wait, so the cockpit is blanked off for now, and probably for ever. The markings are taken from the full size ASW20L, BGA competition number 172. This is based at the Bristol and Gloucestershire Gliding Club, where I used to fly, and am still an associate member. The orange trim was applied using Volkwagen `Brilliant Orange' acrylic, and the grey for the numbers is Ford `Polar Grey'.
I came across some discarded 2.4 Ah nicads from a portable printer, which I built into a 6v pack. This is mounted well forward and reduces slightly the amount of ballast required, but a couple of pounds of lead is still needed to attain the required CG. Using five cells compensates for slow (cheap) servos, and long wiring looms to the ailerons. The high capacity should ensure an adequate supply for the seven servos for as long as I need.
The first flight took place in a blustery north-westerly, one Sunday morning on Selsley Common, (near Stroud in Gloucestershire) in June 1999. This is the only local slope where I would contemplate flying a model of this size (at least until I get the hang of it) since unlike the other excellent local sites there is plenty of space to land. The all up weight is 131/2 lb, and the fuselage is too big to grip, so launching requires either a bit of spit, or a pair of these gloves with nobbles of sticky plastic on. A fit and strong helper with no history of back trouble or hernia, and with considerable experience of flying and launching big scale models was sought out. No-one volunteered, but fellow club member Bryan Tucker was persuaded to do the honours. Apart from needing a bit of down trim, the ASW flew perfectly right from the launch. I had about 50% rudder mixed in with ailerons, but could have done with a bit more, so I was using `manual' rudder as well. I now use 70%. The lift was very good and height gain was easy. This was wonderful. After all that hard work, it looked so realistic in the air, and could put on a fair show of loops and chandelles. Running past the slope at high speed produced a satisfying swishing noise, just like the full size. Majestic! Rolls came much later: at that time I only had a six-channel receiver, and did not have the flaps coupled to the ailerons, so the roll rate was slooow. This was all good fun, however... there were dark murmurings about turbulence and gusts behind the slope, and at some point I was going to have to land this thing.
I tried out the airbrakes, with and without landing flap, at a safe altitude. The descent rate was more than adequate either way. In fact with full airbrake, even with neutral flap, it comes down like the proverbial Steinway. The 250 mm brakes would probably have been plenty big enough - Pat was right. The actual circuit and approach seemed well under control, but with the turbulence it might have touched (thumped) the tail down a bit harder than I would have liked. This resulted in a broken rudder hinge, so that was the first and last flight that day.
Suitable days to fly the ASW are when (a) there is a wind between N and W, so that Selsley is working; (b) it is not raining or snowing; (c) I am not working; (d) there is not a domestic problem needing urgent attention; (e) we are not away for the weekend. All these limitations considered, the next suitable day came more than six months after the maiden flight, between Christmas and New Year 1999/2000. The wind was much more constant, slightly lighter, and much, much colder. Three flights were made that day, and another three the following day, and several more followed in the next three months. I have now fitted a seven channel receiver, and all the functions work correctly. Plenty to play with, and it will do a slow roll, though not a quick one. Launching remains a problem - sometimes I can do it myself, but if there is too little or too much of a breeze it really requires a helper.
During one outing in March 2000 I spotted the full size 172 overhead on its way back to Nympsfield, a couple of miles away. We had a camera handy, but I was not quick enough to get the two in the frame together in the air. However, later that day I dropped into the gliding club and took a couple of photos of the two together on the ground (see the Photos section of the club website).
This is an impressive model. It flies beautifully and always draws favourable comments, and much interest from modelling people and passers by alike.
John Bennett, 2000.
Sequel
Since writing this article in 2000, much water has passed under the bridge. I'm now five years older, and so is the ASW, and I suppose we are both showing signs of ageing. However, the model still flies as well as ever, and having gained in experience and confidence, I reckon I do too.
I still have not added cockpit detail, but I have rearranged the radio gear to make room for a pilot and instruments, etc. Maybe soon! Last year I made a pair of 'Masak' winglets, as per the full-size, so now have a choice of three pairs of tips: standard; extended; and turned-up. I have also fitted an aerotow release and built a launching dolly, so hope to aerowtow it soon.
The original ASW 20L is no longer at Nympsfield, but the syndicate kept the number 172 (it's like cherished car number plates - you can transfer it to another glider) and it's now on a nice new ASW 27. I am now looking for an ASW 27, preferably a second-hand Purbeck 1/4 scale model, so that I can have two 172's.
Review from : John Bennett